


For direct-to-consumer ecommerce shops, nice photographs are the one means for potential prospects to fall in love together with your merchandise. However in case you promote glass vases, sun shades, sparkly jewellery, or different reflective merchandise, the photographs you are taking require a bit of extra preparation.
Reflective floor pictures will be difficult: gentle spots, reflections, and different blemishes can take away from the standard of your photos. Merchandise with distinctive shapes could make reflections and highlights tough to handle constantly.
The important thing to getting the right shot each time is in minimizing reflections by tweaking lighting, digital camera angles and settings, and product positioning. And don’t fret—for higher photographs you received’t must lay our a fortune on lighting and fancy tools.
Forward, study the guidelines you need to use to make your subsequent product shoot with reflective objects a hit.
What’s reflective floor pictures?
Reflective floor pictures is the method of taking pictures objects which have reflective surfaces. This typically contains issues like mirrors, metallic items, glass objects, sun shades, and jewellery.
What to keep away from when taking pictures reflective objects
Images seize the appear and feel of your merchandise, and the extra crisp and correct they’re the extra they are going to instill belief in your prospects.
🏆The aim: Decrease reflections and produce crisp, vibrant photos
📸The method: Discover the correct angles, give attention to getting lighting proper, and go for sharp closing photos
Listed here are the principle issues it’s worthwhile to do to achieve success:
- Handle reflections. Discover the very best angle that minimizes or eliminates distracting reflections. You’ll need to keep away from seeing your digital camera, your self, or your gear in a mirrored image within the completed picture.
- Keep away from harsh lighting and shadows. An excessive amount of brightness can change the best way the colour of your merchandise look, which might result in pissed off prospects.
- Be weary of blurry photographs. Reflective merchandise typically have a lot of tiny logos, edges, and particulars that must be sharp within the closing shot. Purpose for crip photos that present the entire particulars.
How to decide on the correct gear
You don’t must lay our a fortune on gear. Getting nice outcomes when taking pictures reflective surfaces relies upon extra on a correct lighting setup than the rest. You possibly can realistically skip splurging on an costly digital camera and take the photographs in your smartphone.
🏆The aim: Buy the gear you want with out going over price range
📸The method: You’ll use this gear to attenuate reflections, management gentle, and create sharp photos that present advantageous element
For product photographs of shiny objects particularly, we advocate buying:
1. Softbox (or different diffusion materials)

A softbox diffuses gentle on an object, making a softer, extra pure glow. Tender aspect lighting emphasizes object particulars and reduces shadows. When you’re in a pinch or low on price range, you too can use cardboard to bounce gentle (extra on this under). We advocate getting an umbrella as effectively.
Value: You should buy a softbox for about $50 to $80.
2. Wi-fi/distant flash

A wi-fi or distant flash is one you could set off from afar. These flashes add extra gentle and are significantly helpful while you’re utilizing backlighting as a way. Backlighting works effectively for photographing glass and different shiny translucent objects.
Value: Buy a wi-fi flash that’s suitable together with your iPhone for round $120.
3. Polarizing filter

Similar to your polarized sun shades, a polarizing filter can minimize down on reflections. These filters are inexpensive, and in case you’re utilizing a smartphone, you should buy one which’s suitable with it.
Value: You should purchase a polarizing filter that’s suitable with a smartphone for $18 to $80.
📸Tip: Take a look at our information to product pictures for extra DIY pictures gear suggestions that received’t break the financial institution.

Free Information: DIY Product Pictures
Discover ways to take stunning product photographs on a price range with our free, complete video information.
Get our DIY Information to Lovely Product Pictures delivered proper to your inbox.
Virtually there: please enter your e mail under to realize immediate entry.
We’ll additionally ship you updates on new instructional guides and success tales from the Shopify e-newsletter. We hate SPAM and promise to maintain your e mail tackle secure.
The way to {photograph} jewellery, sun shades, and different detailed merchandise
In case your prospects are buying one thing from you on-line that they’ll’t see in individual, they’re going to need to see as a lot element as doable. The aspect lighting method may also help.
🏆The aim: Emphasize advantageous particulars
📸The method: Facet lighting
Earlier than you get began, you’ll must arrange your digital camera or smartphone, modify the settings, procure a number of objects, and place your object on a clear white background. Now, right here’s the way to {photograph} shiny objects with out glare.
Step 1: Modify your digital camera settings to get the clearest doable picture
Guarantee your white stability, aperture, and ISO settings are optimized on your lighting setup, and that your digital camera settings take full benefit of your lighting setup, too.
- Modify your white stability in keeping with your gentle supply, just like the flash setting in case you’re utilizing a strobe. When you’re unsure, auto white stability is usually reliable. Select an outlined a part of your object to give attention to, like a watch face or the outer fringe of clear glassware.
- Shoot in handbook mode. Set your aperture to no less than f/11, however ideally larger (like f/16). Use the bottom ISO doable, like ISO 100, to seize probably the most element.
- Contemplate your shutter velocity. For a backlit setup, you’ll in all probability must sluggish your shutter velocity down a few stops under your gentle meter’s suggestion as a way to overexpose the picture. For aspect lighting and overhead lighting, you’ll be able to observe your gentle meter’s suggestion.
✨Study extra about digital camera settings in our information to DIY product pictures.
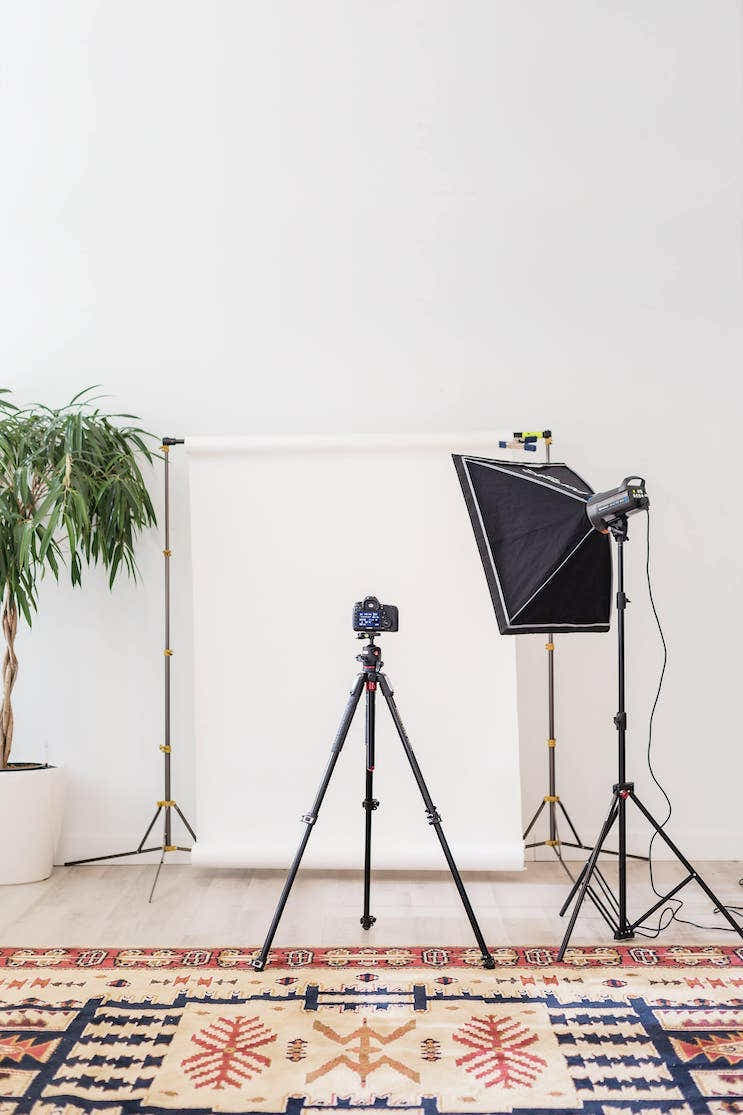
Step 2: Arrange your digital camera
Your digital camera ought to be on a tripod and raised so that you just’re taking pictures barely down at your product. Elevation on this setup will assist decrease reflections, however don’t go so excessive you could’t get a flattering angle of your product.
Grasp the white rolled paper in order that it sweeps down and beneath your product, which you set on the desk. “Sweeping” the paper signifies that it curves in such a means that there are not any outlined strains, eliminating shadows attributable to creases. Join the tip of the sweep to the underside of your digital camera lens to forestall foreground reflections.
Place two items of white foam board immediately reverse the sunshine supply, taped collectively to type a V. The V will funnel mirrored gentle again onto your product. That is what it seems like:

Step 3: Use aspect lighting to spotlight element
Facet lighting works effectively for detailed glassy merchandise like sun shades and watches. A field backlighting setup received’t work with extra detailed merchandise as a result of it’s used, partially, to overexpose element.
✨What you’ll want: To aspect gentle a small product, you’re going to wish a big desk, a steady or strobe gentle, an umbrella, foam boards, and a roll of seamless white paper.
Place the sunshine, subtle by an umbrella, on to the left of your product.
In some cases, like when taking pictures a watch, you might want to maneuver from direct aspect lighting to 45-degree aspect lighting as a way to successfully illuminate the face with out glare.
This watch, for instance, was shot with 45-degree aspect lighting.
The way to shoot glass, bottles, and different translucent merchandise
Glass merchandise at all times have reflective surfaces, they usually’re tough to {photograph} with out capturing undesirable reflections. Forward, study the field backlighting technique for tough translucent merchandise and glossy surfaces.
🏆The aim: Emphasize form
📸The method: Field backlighting
Backlighting is right for taking pictures clear or coloured glass, like bottles, wine glasses, or ornamental glassware. It’s a easy method that makes use of the translucency of glass to create a crystal clear look whereas nonetheless exhibiting off a flattering form.
As an illustration, this glass jar was shot with field backlighting:
Just like the title suggests, in a backlit setup, you’ll place your gentle supply immediately behind your product.
Step 1: Place your gentle supply
For finest outcomes, place your gentle supply in order that the brightest a part of your gentle shines by the glass, emphasizing the pure curves and outer strains of your product. Stage your product and light-weight supply in order that they’re on the identical aircraft.
You should use steady or strobe lighting, however it’s essential to diffuse your gentle. Ideally, you must have a lighting umbrella, however skinny white materials like material or layers of rolled paper can work in a pinch.
✨Study extra: Take a look at our checklist of 40 instruments for DIY product pictures.
Step 2: Create a field
Put your gentle diffuser between the sunshine and your product, after which place a white foam board below and on either side of your product. Place one other foam board or extra paper throughout the highest.
The thought right here is that mushy gentle can be mirrored again onto your product from all sides, wrapping round it evenly. The white spots and reflections that may typically present up in photographs of glass outcome principally from the bounce of harsh direct gentle, so you’ll be able to keep away from these ugly blemishes by softening your gentle supply and making use of oblique gentle.
Step 3: Place the boards
For extra outlined outer edges, you need to use black foam boards as an alternative of white. This will increase saturation and creates bolder outlines and colours. Watch how the outer strains of our vase under grow to be darker as we add and modify foam boards.
Here is a glass vase shot with no boards.
Here is the identical vase shot with white boards.
Now, with black boards.
And, lastly, with black boards moved in nearer.
The way to seize metallic and different reflective objects
Steel is probably the most difficult floor to shoot due to how extremely reflective it’s.
You possibly can decrease and even get rid of reflections through the use of a double overhead lighting setup for taking pictures small metallic merchandise like jewellery, pots and pans, and cutlery.
🏆The aim: Decrease undesirable reflections
📸The method: Double overhead lighting
This system is all about angles—of your digital camera, your lighting, and your cardboard “gentle bouncer.”
✨What you may want: With a view to shoot reflective surfaces like metallic efficiently, you’re going to wish a desk, two lights with umbrellas, and a white paper sweep. No foam board this time as a result of we’ve received two lights they usually’re going to be subtle by the umbrellas. With the opposite two setups it doesn’t significantly matter whether or not you utilize strobe or steady lighting, however this time we advocate strobe lighting for elevated management.
Place a light-weight on either side of your product and diffuse every of them with umbrellas. Angle your lights down on the product and set every to the identical energy.
Place your digital camera on a tripod in order that it faces the product and is angled barely down. Sweep the white paper down below your product and fasten it to your digital camera lens to attenuate fall off reflections.
In case your product has been cleaned and prepped and also you get the lighting proper, you’ll find yourself with reflection-free images, similar to the one under.
When doubtful, edit it out in put up processing
If spots, smudges, and even a kind of pesky reflections snuck its means into an object’s floor in your picture, clear it up in post-production processing.
Clone out imperfections and verify shade accuracy. Heal defects you had been unable to restore, like scratches or scuffs. Minimize your product out from its background and place it on pure white to make sure consistency and decrease file dimension.
When you’re promoting on marketplaces like eBay or Amazon, guarantee your photos are compliant or your itemizing could also be eliminated.
Get began with reflective pictures
Despite the fact that there would possibly really feel like there are loads of steps concerned, taking care to make your product pictures look implausible will actually assist your corporation for the long run.
You’ll share these photographs throughout paid adverts, touchdown pages, social media, and in your emails. The photographs you are taking are true reflections of your model and the way you current your corporation to the world.
Replicate gentle, use your diffusion supplies, decrease ugly reflections, get inventive with completely different angles, and don’t be afraid to experiment.
Able to create your corporation? Begin your free trial of Shopify—no bank card required.
Reflective floor pictures FAQ
Why is it tough to shoot reflective product photographs?
Reflective floor pictures will be difficult: gentle spots, reflections, and different blemishes can take away from the standard of your photos. Merchandise with distinctive shapes could make reflections and highlights tough to handle constantly.
What sorts of merchandise are tough to shoot with out reflections?
Shiny objects are tough to shoot with out reflections. This contains issues like metallic, glass, sun shades, jewellery, mirrors, and sun shades.
How can I {photograph} shiny objects with out reflection?
There are a number of completely different strategies you need to use to take photographs of shiny objects with out reflections, relying on what your general aim is. To emphasise particulars and decrease reflections in detailed merchandise like watches, sun shades, or jewellery, a aspect lighting method works finest. To shoot shiny, translucent merchandise, field backlighting works effectively. For minimizing undesirable reflections in issues like metallic, attempt double overhead lighting.
